This article is a basic how-to that presents a deployment solution for the BIRT Report Viewer web app using Tomcat and Apache servers. This deployment solution has the advantage to greatly improve the load handling of the basic deployment solution with only Tomcat.
Deploying and Installing the BIRT viewer on Tomcat is quite easy but if like me you have tried to see how this webapp handles load you might be familiar with the following exception:

When you ask for a report the BIRT web app creates a temporary document that will be used to create the report. This is the major bottle neck of the BIRT web viewer; basically this means that if you have 2 users asking for the same report at the same time one of them will have to wait until the other get his report. That's also means that the web viewer might not be using all the CPUs from your server. Do the following test, ask for a report and watch the CPU usage of your server it won't be using it at 100% at best it will fully use one CPU so if you have quadcore server the CPU usage should be about 25%. So in order to improve your
In the following article I will describe a deployment solution that dispatches the load between multiple instances of Tomcats using the http apache server configured as a tomcat load balancer.
First let's take a look at the components you have to download:
- The BIRT Runtime: http://download.eclipse.org/birt/downloads/
- The Tomcat server: http://tomcat.apache.org/
- The Apache server: http://httpd.apache.org/
- mod_jk Tomcat Module: http://tomcat.apache.org/download-connectors.cgi look in the Binary Releases the one that fits your installation.
In the following I will describe a deployment solution that runs 4 tomcat instances on the same server; you can adjust your installation to set the instance number that fits your needs.
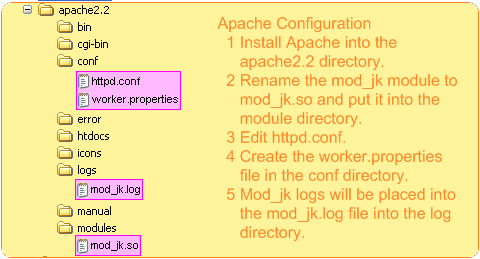
First let's install the Apache Server
Once you have installed your apache server and added the mod_jk module you have to edit the configuration files.
Edit http.conf
First make sure the Listen property is set to 80 then add the following:
LoadModule jk_module modules/mod_jk.so
# Path to workers.properties
JkWorkersFile <path_to_apache_directorty>\conf\workers.properies
# Path to jk logs
JkLogFile <path_to_apache_directorty>\logs\mod_jk.log
# Jk log level [debug/error/info]
JkLogLevel info
# Jk log format
JkLogStampFormat "[%a %b %d %H:%M:%S %Y] "
# JkOptions for forwarding
JkOptions +ForwardKeySize +ForwardURICompat -ForwardDirectories
# JkRequestLogFormat set the request format
JkRequestLogFormat "%w %V %T"
JkMount /<your_birt_webapp> balancer
JkMount /<your_birt_webapp>/* balancer
Create worker.properties
Add the following:
workers.tomcat_home=<tomcat_home>
workers.java_home=<java_home>
worker.list=balancer
# Tomcat main instance
worker.worker1.port=8009
worker.worker1.host=localhost
worker.worker1.type=ajp13
worker.worker1.lbfactor=1
# Second Instance
worker.worker2.port=8019
worker.worker2.host=localhost
worker.worker2.type=ajp13
worker.worker2.lbfactor=1
# Third Instance
worker.worker3.port=8029
worker.worker3.host=localhost
worker.worker3.type=ajp13
worker.worker3.lbfactor=1
# Forth Instance
worker.worker4.port=8039
worker.worker4.host=localhost
worker.worker4.type=ajp13
worker.worker4.lbfactor=1
# Balancer configuration
worker.balancer.type=lb
worker.balancer.balance_workers=worker1,worker2,worker3,worker4
worker.balancer.method=B
Find the full documentation of the worker.properties here:
http://tomcat.apache.org/connectors-doc/reference/workers.html
As all workers are installed on the same server they must have distinct ports and the same host, which leads us to the tomcat installation.
Now let's install the Tomcat main instance

Installing tomcat is easy, the main instance keeps most of its default configuration. Just put the BIRT report viewer web app with your reports into the webapps directory and edit the engine element in the server.xml to add jvmRoute="worker1".
It should look like this :
<Engine name="Catalina" defaultHost="localhost" jvmRoute="worker1">
Install the other Tomcat instances

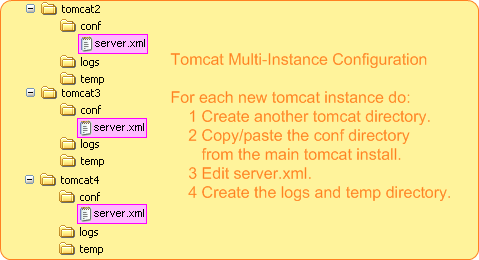
All tomcats are on the same server so they must work on distinct ports, port number should be higher to 2000, beside that there are not specific rules. What I do here is adding 10 to the ports of a new instance.
For each new instance there are 5 modifications to make as underlined in pink in the following:
The ports and jvmRoute should be defined as follow:
| Main Tomcat Instance (default) | Tomcat 2nd Instance | Tomcat 3rd Instance | Tomcat 4th Instance | |
| Server Port | 8005 | 8015 | 8025 | 8035 |
| HTTP Connector Port | 8080 | 8090 | 8100 | 8110 |
| AJP Connector Port | 8009 | 8019 | 8029 | 8039 |
| jvmRoute | worker1 | worker2 | worker3 | worker4 |
The appBase is set on the main tomcat webapps directory. this allows your tomcat instances to share the same webapps. All your resources are centralized in one place.
Now let's run the beast

Ok so at this point you have successfully installed and configured your apache server and tomcat instances. Now you have to launch all this.
In this deployment solution you only have installed 1 tomcat and set the configuration to launch 4 tomcat instances. This is vital for the maintenance, if you want to upgrade your tomcat or change your reports you only have one place to go.
But by default tomcat does not make the difference between where his binaries are and where his configuration files are. Everything is in the CATALINA_HOME environment variable. But you can tell tomcat to use a distinct configuration by defining CATALINA_BASE.
So here is the windows startup script:if "%OS%" == "Windows_NT" setlocal
rem ---------------------------------------------------------------------------
rem Handle Command Args
rem ---------------------------------------------------------------------------
set CMD_LINE_ARGS=
:setArgs
if ""%1""=="""" goto doneSetArgs
set CMD_LINE_ARGS=%CMD_LINE_ARGS% %1
shift
goto setArgs
:doneSetArgs
rem defines the tomcat main install
set CATALINA_HOME="tomcat"
rem defines the tomcat startup executable
set EXECUTABLE=%CATALINA_HOME%\bin\startup.bat
rem launch the main tomcat instance
call "%EXECUTABLE%" start %CMD_LINE_ARGS%
rem launch the 2nd tomcat instance
set CATALINA_BASE="tomcat2"
call "%EXECUTABLE%" start %CMD_LINE_ARGS%
rem launch the 3rd tomcat instance
set CATALINA_BASE="tomcat3"
call "%EXECUTABLE%" start %CMD_LINE_ARGS%
rem launch the 4th tomcat instance
set CATALINA_BASE="tomcat4"
call "%EXECUTABLE%" start %CMD_LINE_ARGS%
rem launch the apache server
call "apache2.2\bin\httpd.exe"
For the shutdown just change the EXECUTABLE variable to shutdown.bat and that's it, you're done !
If you want to start or shutdown only one tomcat instance just set the CATALINA_HOME to the main tomcat instance and CATALINA_BASE to the tomcat instance you want to shutdown or start.
Here is the list of the configuration files you have created/edited for this deployment solution:Download httpd.conf
Download workers.properies
Download tomcat/conf/server.xml
Download tomcat2/conf/server.xml
Download tomcat3/conf/server.xml
Download tomcat4/conf/server.xml
Download Tomcats_startup.bat
Download Tomcats_shutdown.bat
If you find improvements that could be made to this deployment solution please leave a comment.
Thanks


Hi,
I used your advice above and had success getting 4 workers running as per the document. But I didn't see any performance benefit so I'm wondering whether I a) got something wrong or b) have the wrong expectation.
I have some reports which produce a large number of charts on large amounts of data. I can see on a server with 8 cores and 10GB of RAM that the query in SQL Server only takes 4 seconds where as BIRT sits there churning away for about 15 minutes at only 12% CPU (this is a normal Tomcat installation without load balancing).
Any suggestions?
Thanks in advance.
Rob.
Rédigé par : Robert Jones | 07 avril 2011 à 08:32